Tips for Using Word on PC
Page Settings
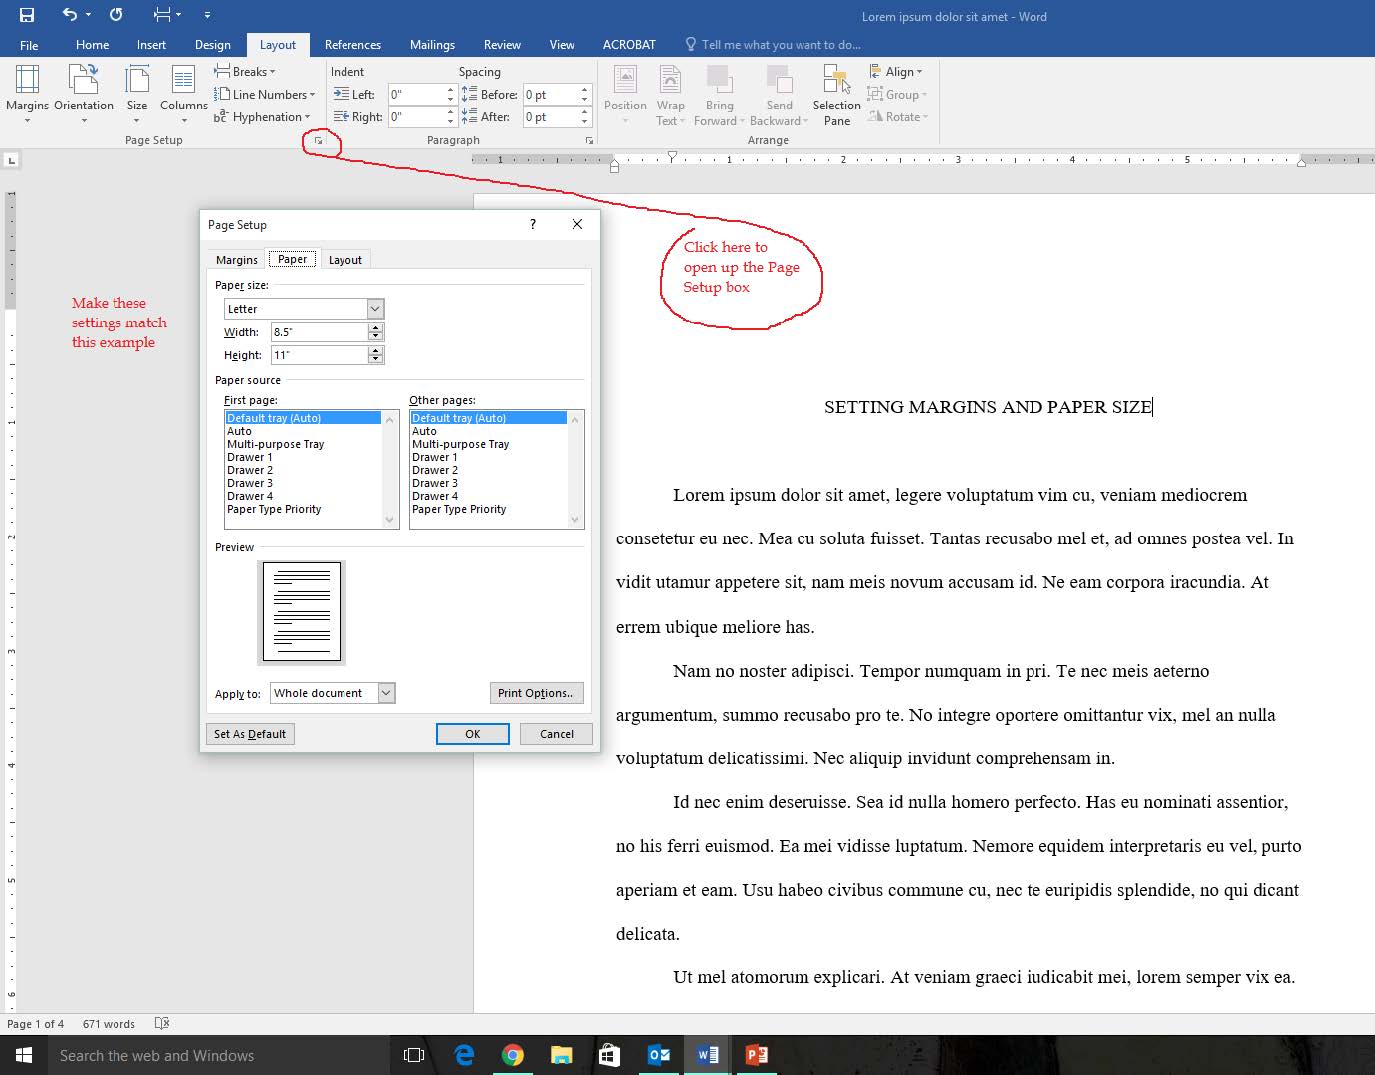
Check page size
- Click Layout tab.
- Click the Size icon.
- Select Letter 8.5" X 11"
Click to see larger version of screenshot
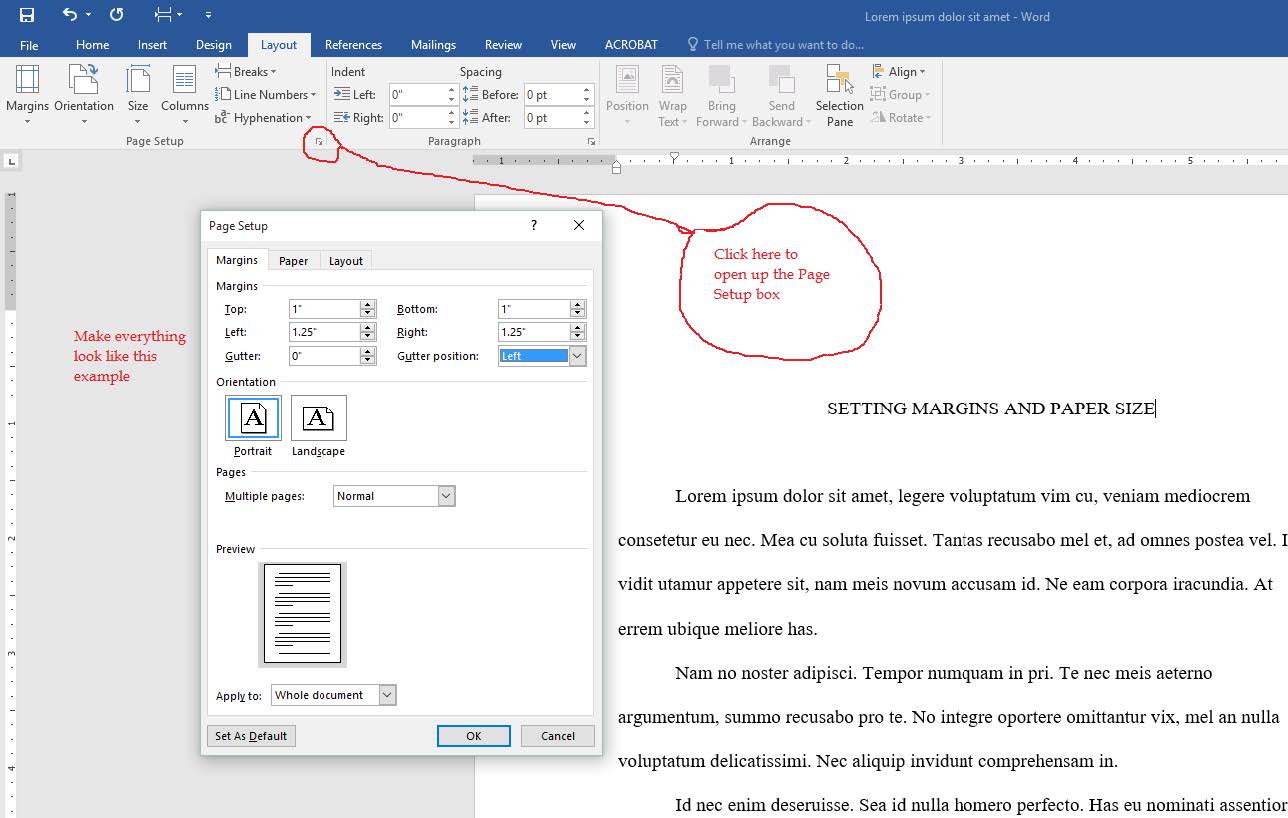
Check margins
- Click Layout tab.
- Click the Margins icon.
- Select Office 2003 default OR click Custom Margins.
- If using Custom Margins, enter the following settings in the Page Setup dialogue box
that opens.
- Margins tab
- "Top:" = 1"
- "Bottom:" = 1"
- "Left:" = 1.25"
- "Right:" = 1.25"
- "Gutter:" = 0"
- "Gutter position:" = Left
- "Multiple pages:" = Normal
- "Apply to:" = Whole document
- Layout tab
- "Header:" = 0.5"
- "Footer:" = 0.5"
- "Apply to:" = Whole document
- Margins tab
- Hit OK
- If using Custom Margins, enter the following settings in the Page Setup dialogue box
that opens.
- If you have multiple sections in your document, check each section.
Click to see larger version of screenshot
Spacing
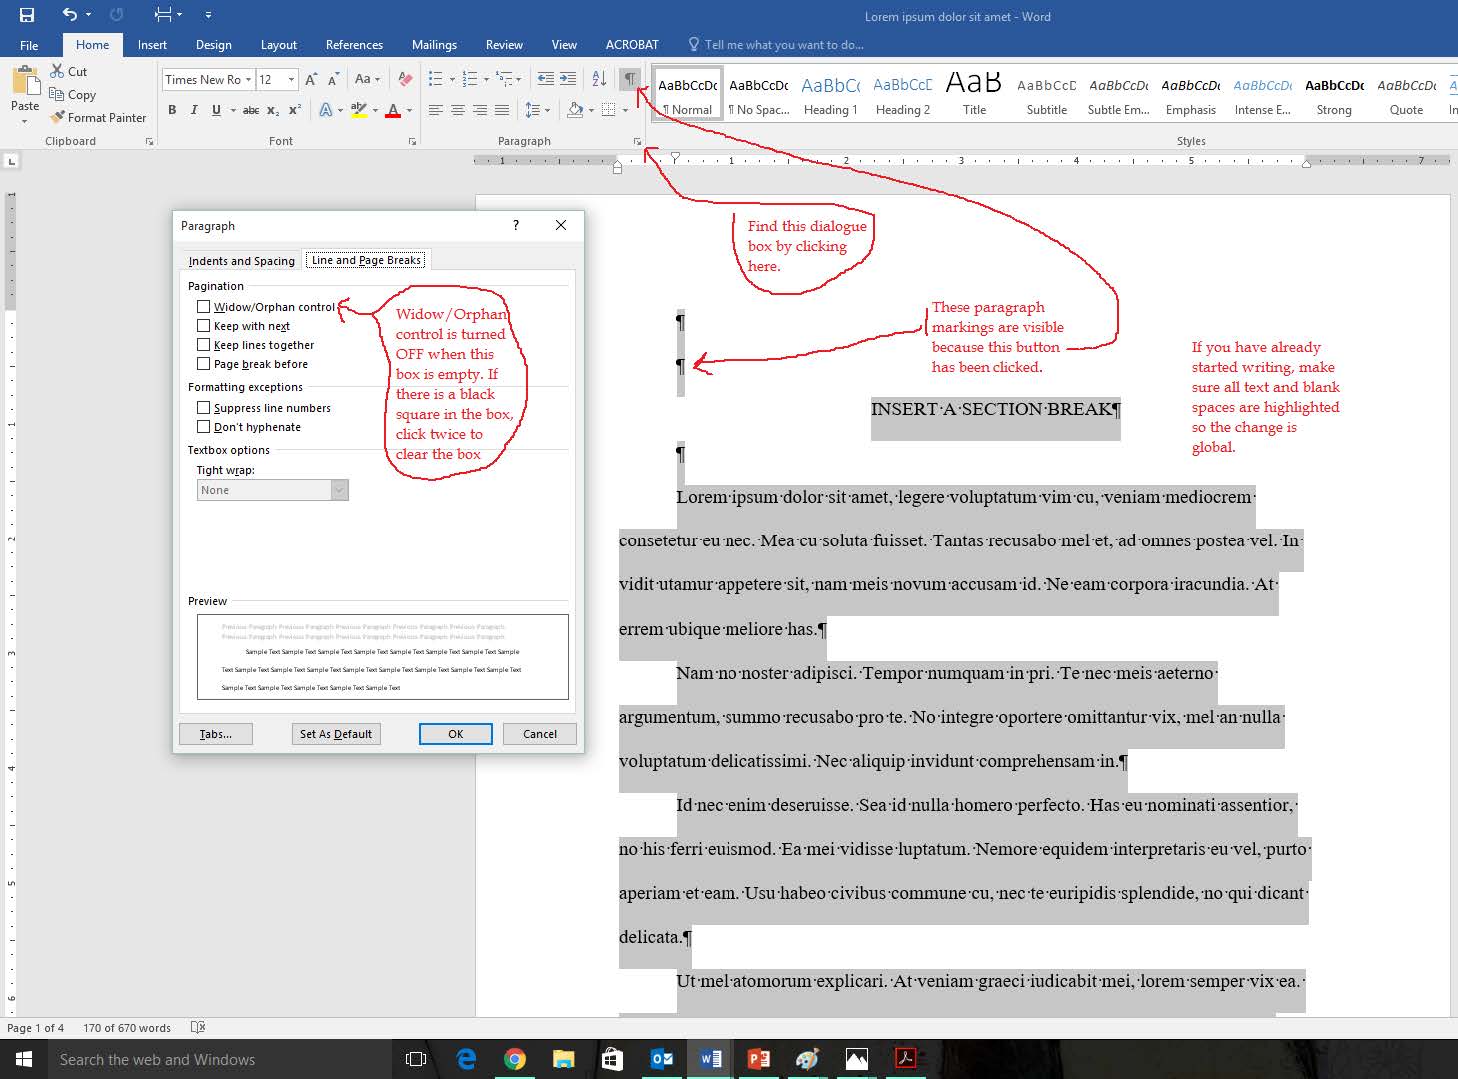
Turn off Widow/Orphan control
- Select all the text in your document.
- Click the Home tab.
- In the Paragraph section of the tool ribbon there is a little arrow in the bottom right corner. Click that arrow. It will open a dialogue box.
- Click the Line and Page Breaks tab and check the following setting.
- If the box Widow/Orphan control has a check mark, click the box to remove the check.
- If there is a black box in the Widow/Orphan control box, click twice until the box is clear of any black box or check mark.
- Hit OK.
Click to see larger version of screenshot
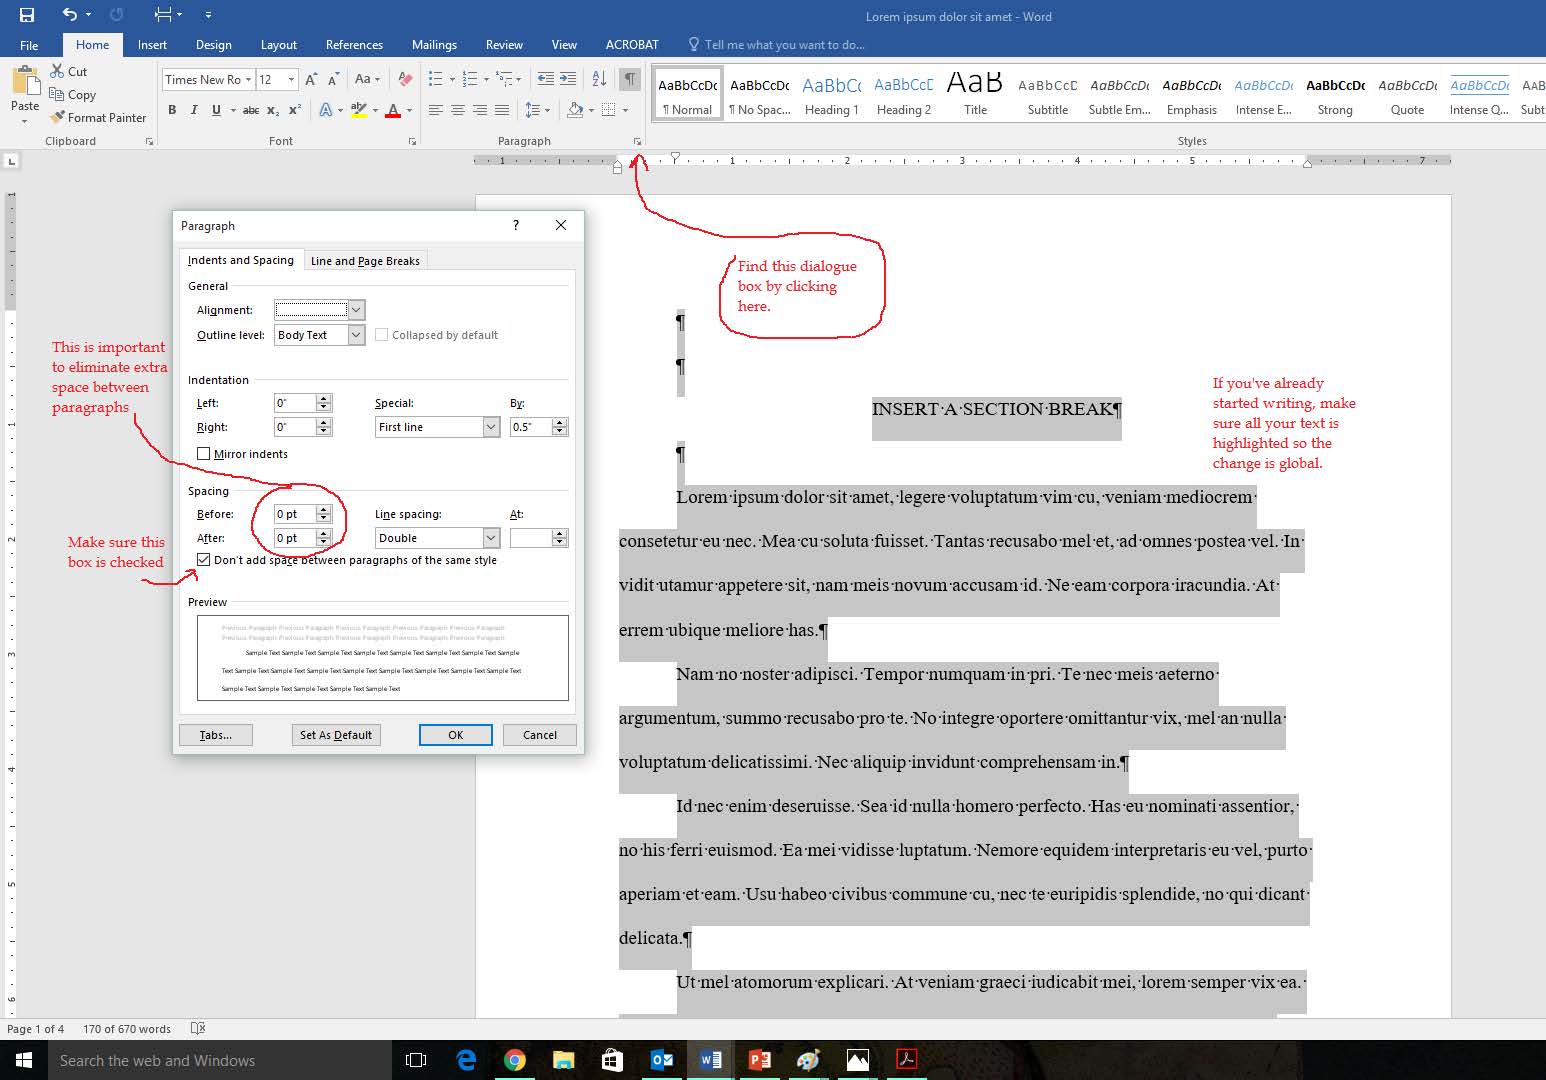
Check line spacing
- Select all the text in your document.
- Click the Home tab.
- In the Paragraph section of the tool ribbon there is a little arrow in the bottom right corner. Click that arrow. It will open a dialogue box.
- Click the Indents and Spacing tab and enter the following settings.
- "Before:" = 0 pt
- "After:" = 0 pt
- "Line spacing:" = Double
- Click the box that says “Don’t add space between paragraphs of the same style.”
- Hit OK.
- Now you can create heading spaces by simply hitting enter twice.
Click to see larger version of screenshot
No gaps or white space in text
- Continue the text to the 1” bottom margin.
- EXCEPTIONS: Places where it is acceptable to have a gap or white space.
- At the bottom of the page if there is a subheading and the white space is not large enough for the heading space, the subheading, and 2 lines of text below the subheading. This also applies if there are two subheadings in a row, there must be at least 2 lines of text below the bottom-most subheading.
- At the end of a chapter.
- If you are using footnotes and there needs to be a white gap because on the top line of the next page is a footnote that would not fit if the line were moved to the previous page.
- EXCEPTIONS: Places where it is acceptable to have a gap or white space.
Section Breaks
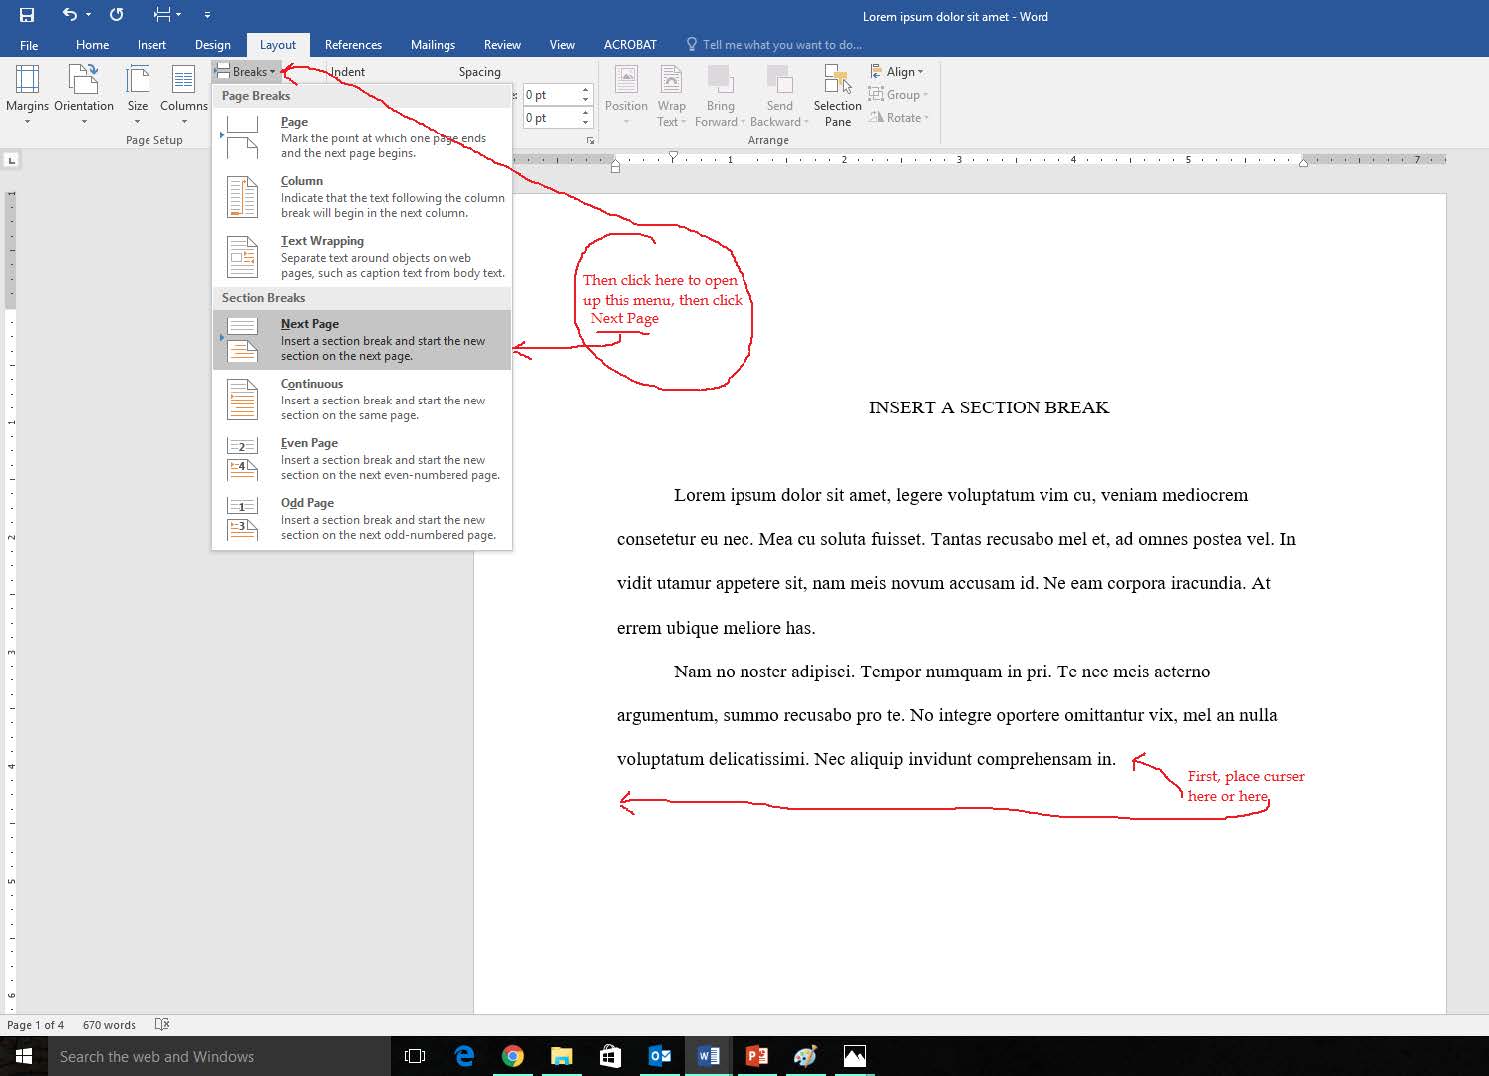
Insert a section break
- Place your cursor where you would like the section to end.
- Click the Layout tab.
- Click the Breaks icon.
- Click Next Page.
Click to see larger version of screenshot
Add "Insert Page Section Breaks" to Quick Access Toolbar
Step 1
- Locate the Customize Quick Access Toolbar button and click it.
- In the top, left corner are the Save, Undo and Redo buttons. Next to those is a button that has a small horizontal line with a down arrow under it. Click it to edit the Quick Access Toolbar.
- Select More Commands...
- This will open the "Word Options" dialogue box.

Click to see larger version of screenshot
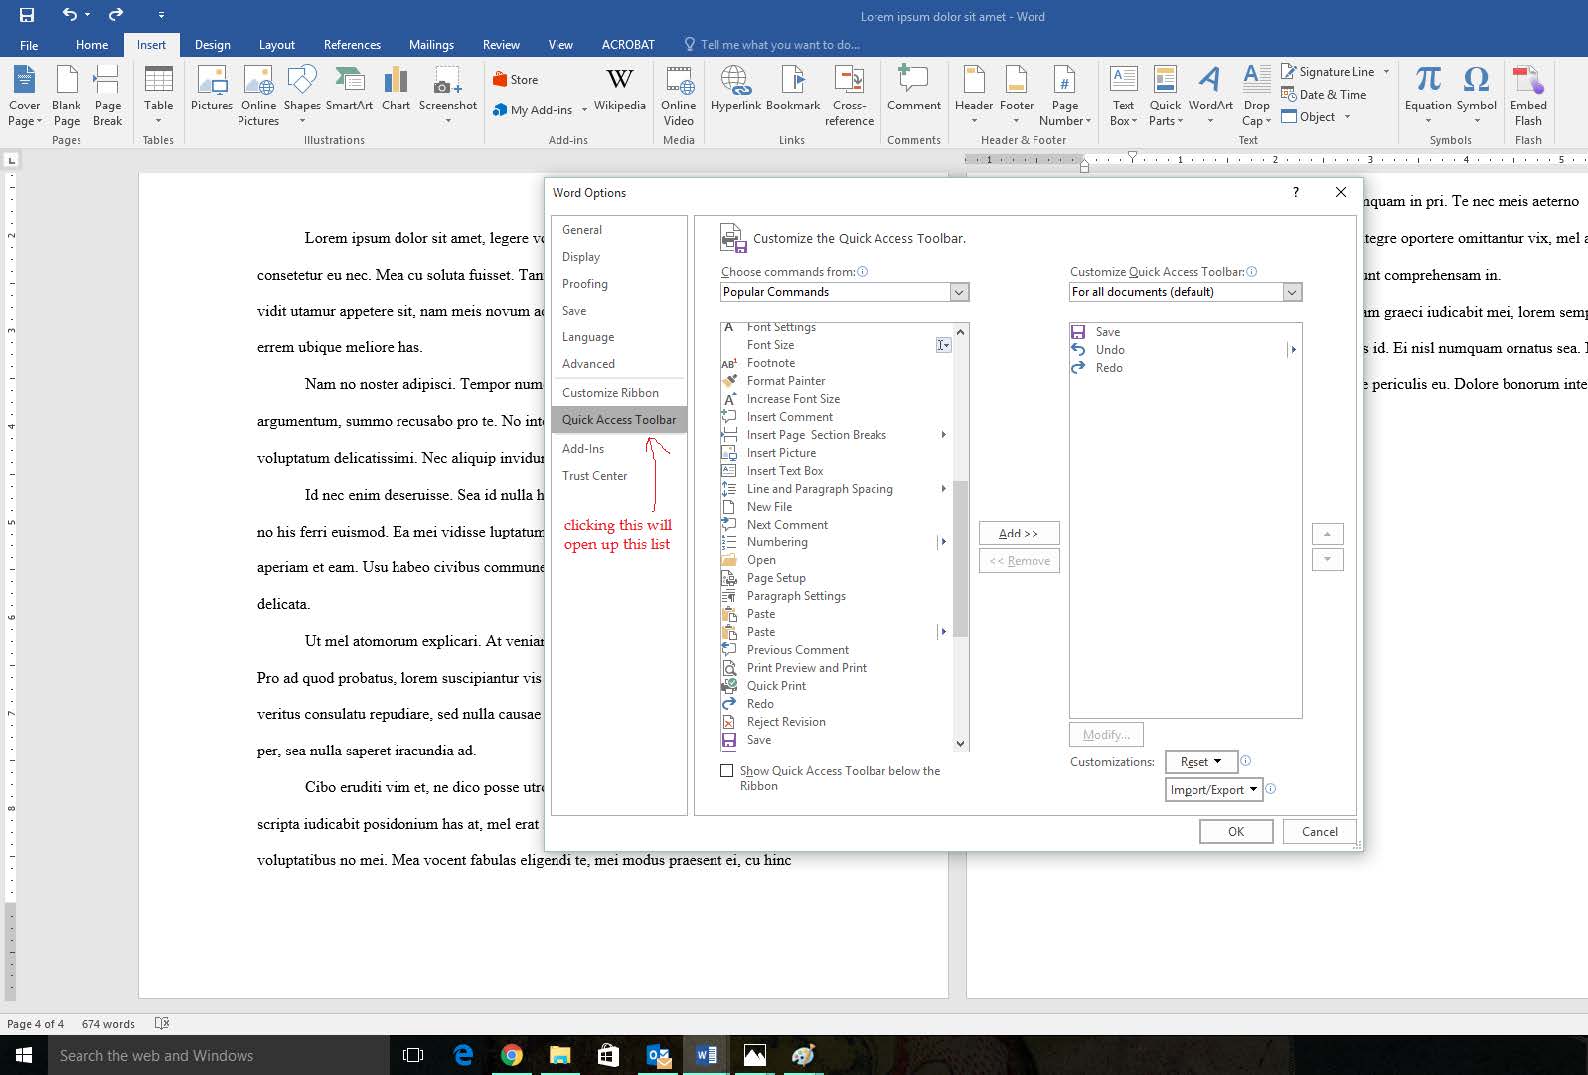
Step 2
- In the left column of the dialogue box, click Quick Access Toolbar.
- This will open a commands list.
Click to see larger version of screenshot
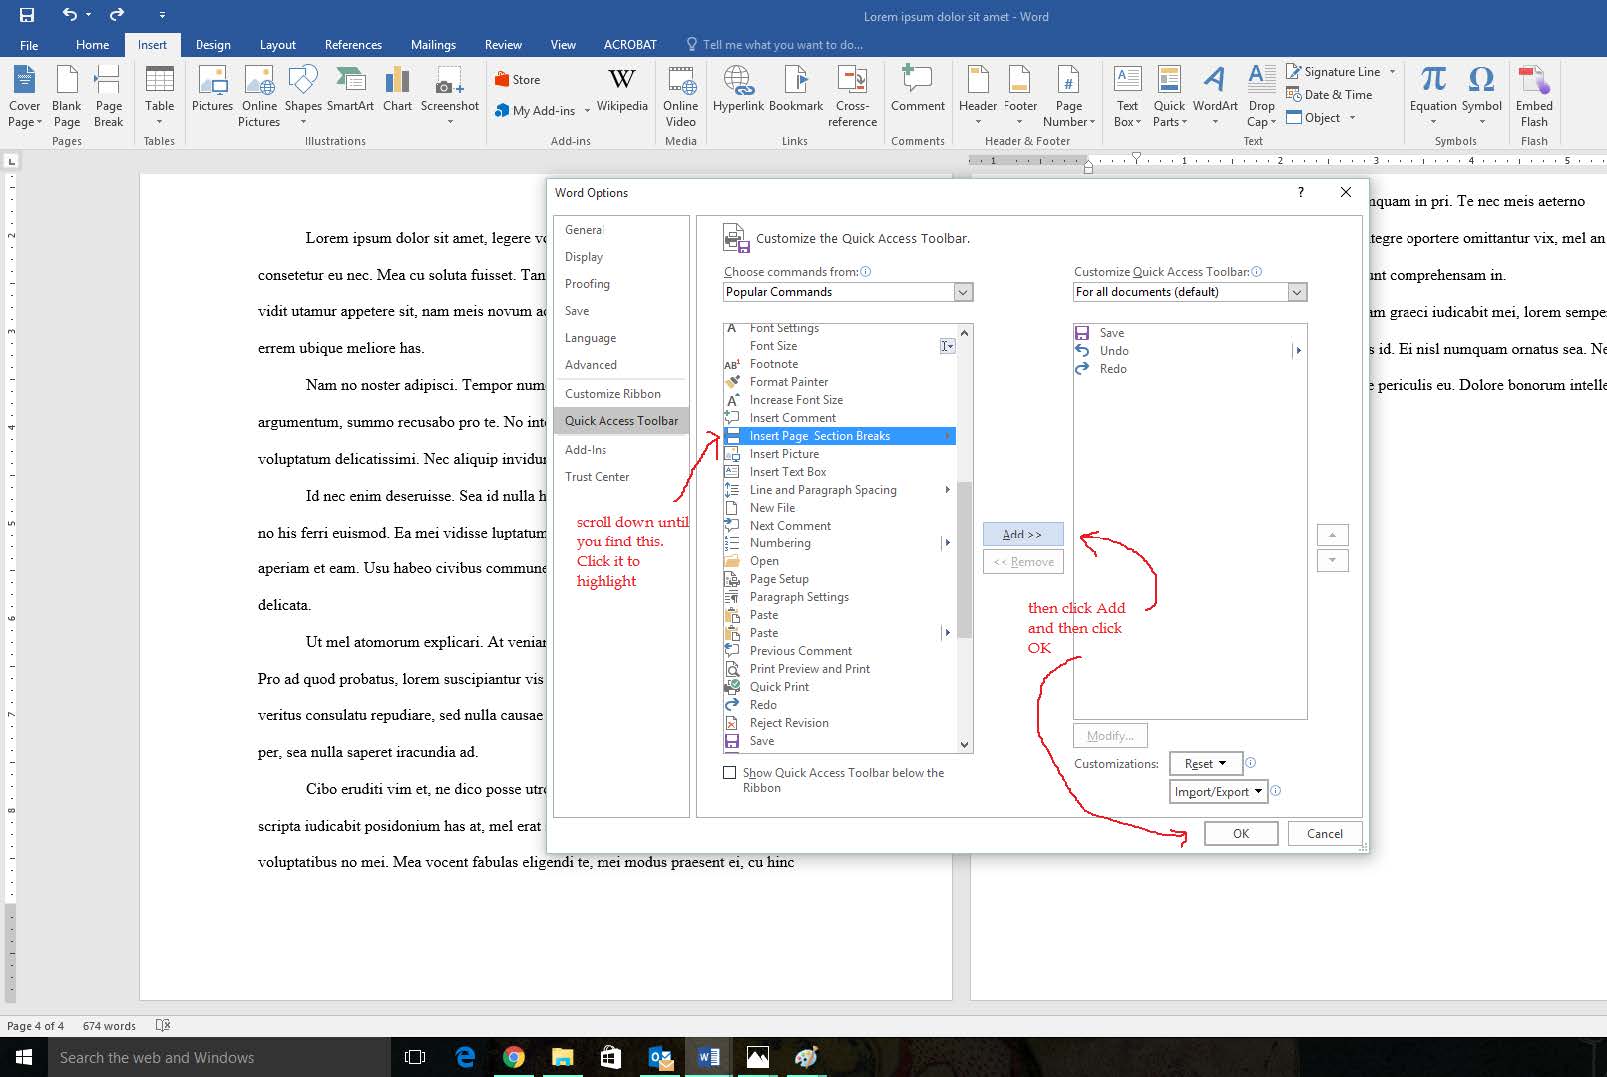
Step 3
- In the commands list, scroll to "Insert Page Section Breaks" and click it.
- Click Add.
- Hit OK.
Click to see larger version of screenshot
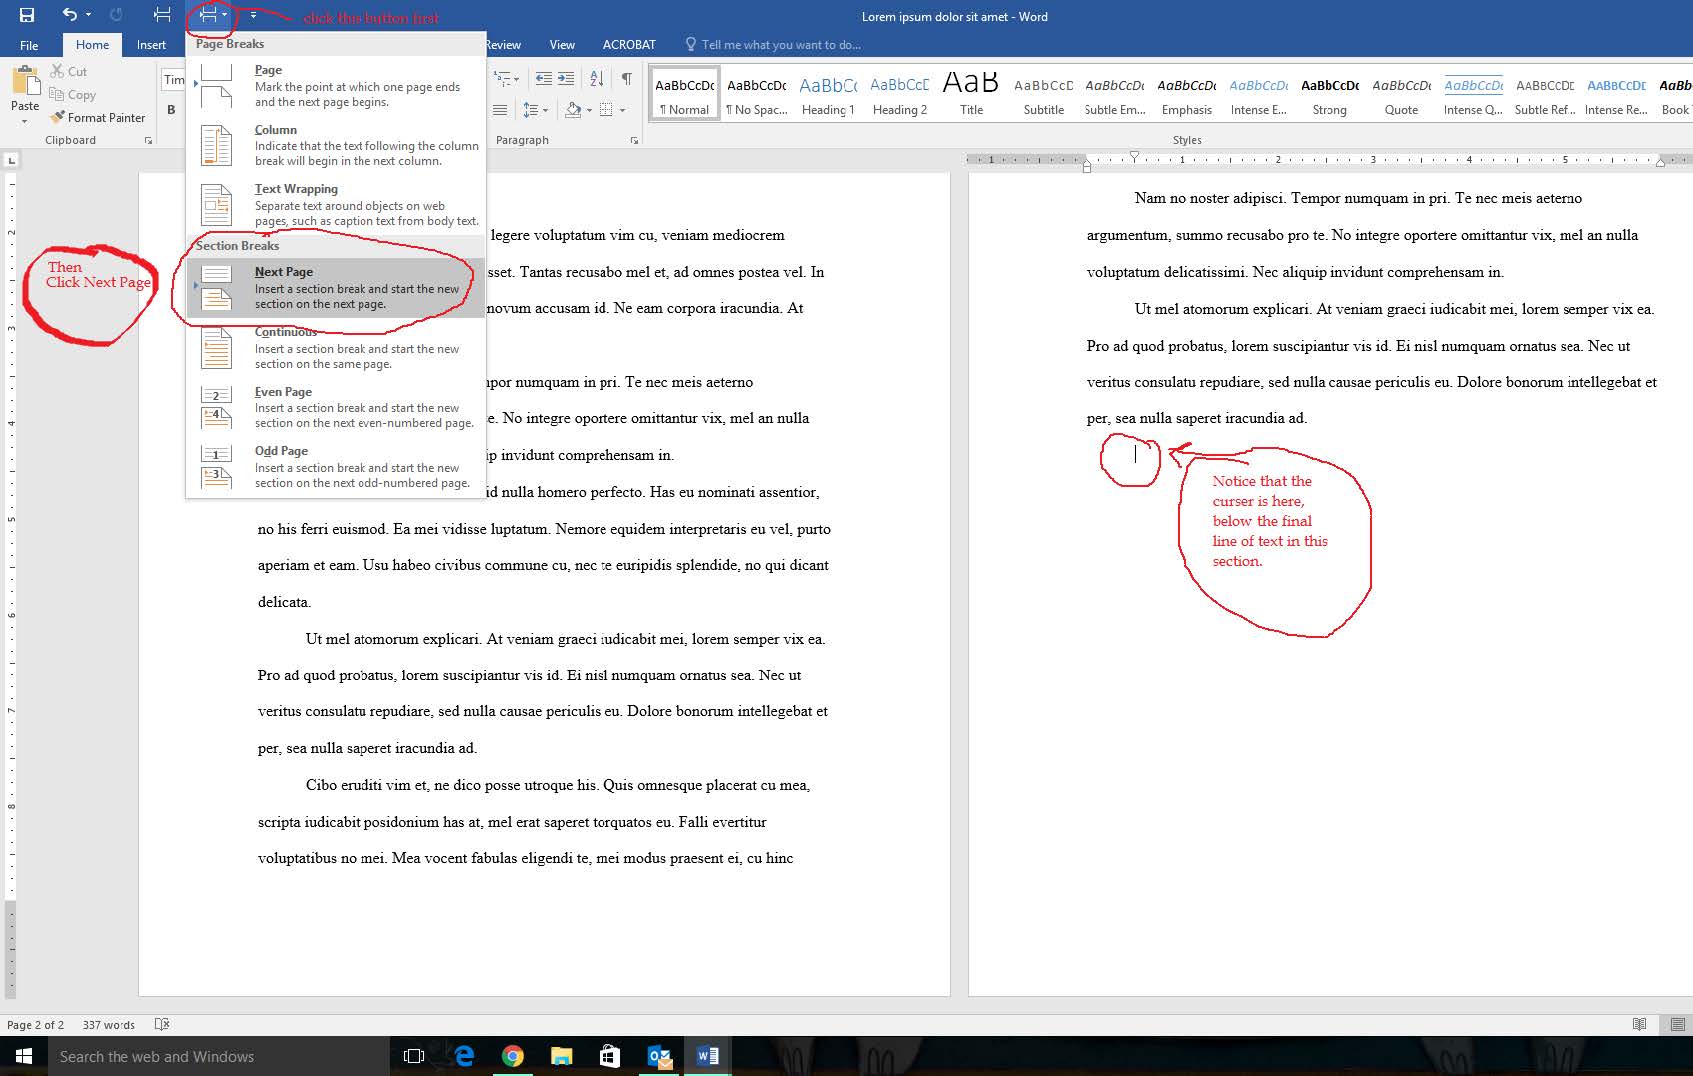
Adding section breaks using the Quick Access Toolbar
- Place your cursor where you would like the section to end.
- After following the 3 steps above, a new button should appear in the Quick Access Toolbar button.
- This button has two incomplete, stacked rectangles with an arrow pointing left between them and an arrow pointing down on the right side. Click it.
- Click Next Page.
Click to see larger version of screenshot
Page Numbers
No page numbers on MAIN HEADING pages in the preliminary pages
NOTE: This applies only to second pages of Abstract, Table of Contents, Lists of Figures and Tables, Acknowledgments, and all preliminary pages. (Numbers do not appear on pages with main headings).
- Insert a section break at the end of the preceding page if there isn’t already one there.
- Click in the footer space on the bottom of the second page of the section where you would like a page number to appear.
- Make sure “Link to Previous” is turned on (it will have a darker background color).
- EXCEPTION: When inserting a page number onto a second page of an abstract, you do not want “Link to Previous” turned on.
- Make sure the box stating “Different First Page” has a check mark.
- Insert page number (Roman numerals in center bottom of page).
-
- For the Abstract
- Click Page Number icon.
- Hover over "Bottom of Page" then click "Plain Number 2."
- Click Page Number icon again.
- Click Format Page Numbers... and enter the following settings.
- "Number Format:" = i, ii, iii…
- "Start at:" = iii
- Hit OK
- For all other sections
- Follow the same procedure described for the Abstract, but start at whatever is the first page of the current section.
- For the Abstract
-
- If you have done it correctly there will be no page number on the first page, but page numbers will appear on all subsequent pages of the section.
- Repeat by creating a new section for each MAIN HEADING page (Abstract, Table of Contents, etc.).
No page numbers on MAIN HEADING pages
- Create a new section by inserting a section break at the end of the preceding page.
- Click in the header space at the top of the second page of your new section.
- Make sure “Link to Previous” is turned on (it will have a darker background color).
- Make sure the box stating “Different First Page” has a check mark.
- Insert page number (Arabic numerals in top right of page).
- If you have done it correctly there will be no page number on the first page, but page numbers will appear on all subsequent pages of the section.
- Repeat the steps above and create a new section for each MAIN HEADING page.
- For the first main text section (your first chapter), make sure the box “Link to Previous” is NOT selected in either footer or header.

Click to see larger version of screenshot
Alternative methods to remove page numbers
- After converting to PDF, remove the page numbers on the MAIN HEADING PAGES using Acrobat Pro
Correct number placement on landscape pages
The University of Aberdeen has a tutorial that details how to rotate landscape page numbers to match the Portrait layout.
Footnotes
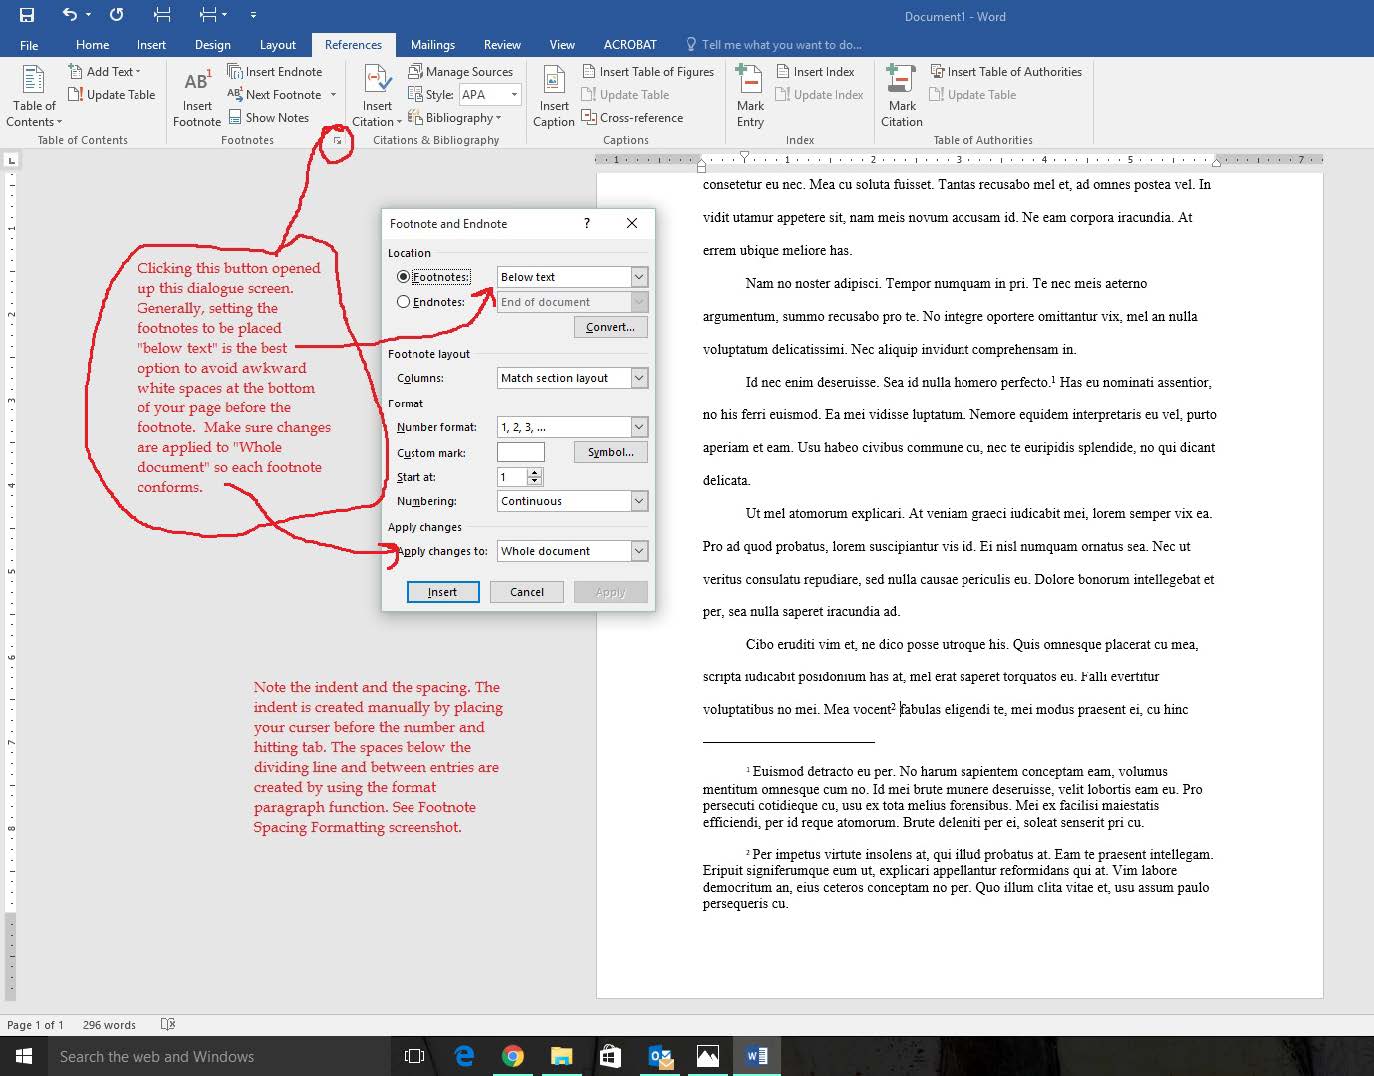
Formatting footnotes
- Place your cursor where you want your first footnote number.
- Click the References tab.
- In the Footnotes section of the tool ribbon there is a little arrow in the lower right corner. Click that arrow. It will open a dialogue box.
- Enter the following settings.
- "Footnotes:" = Below text
- "Apply changes to:" = Whole document
- Hit Insert.
- This will help eliminate white gaps caused by footnotes.
Click to see larger version of screenshot
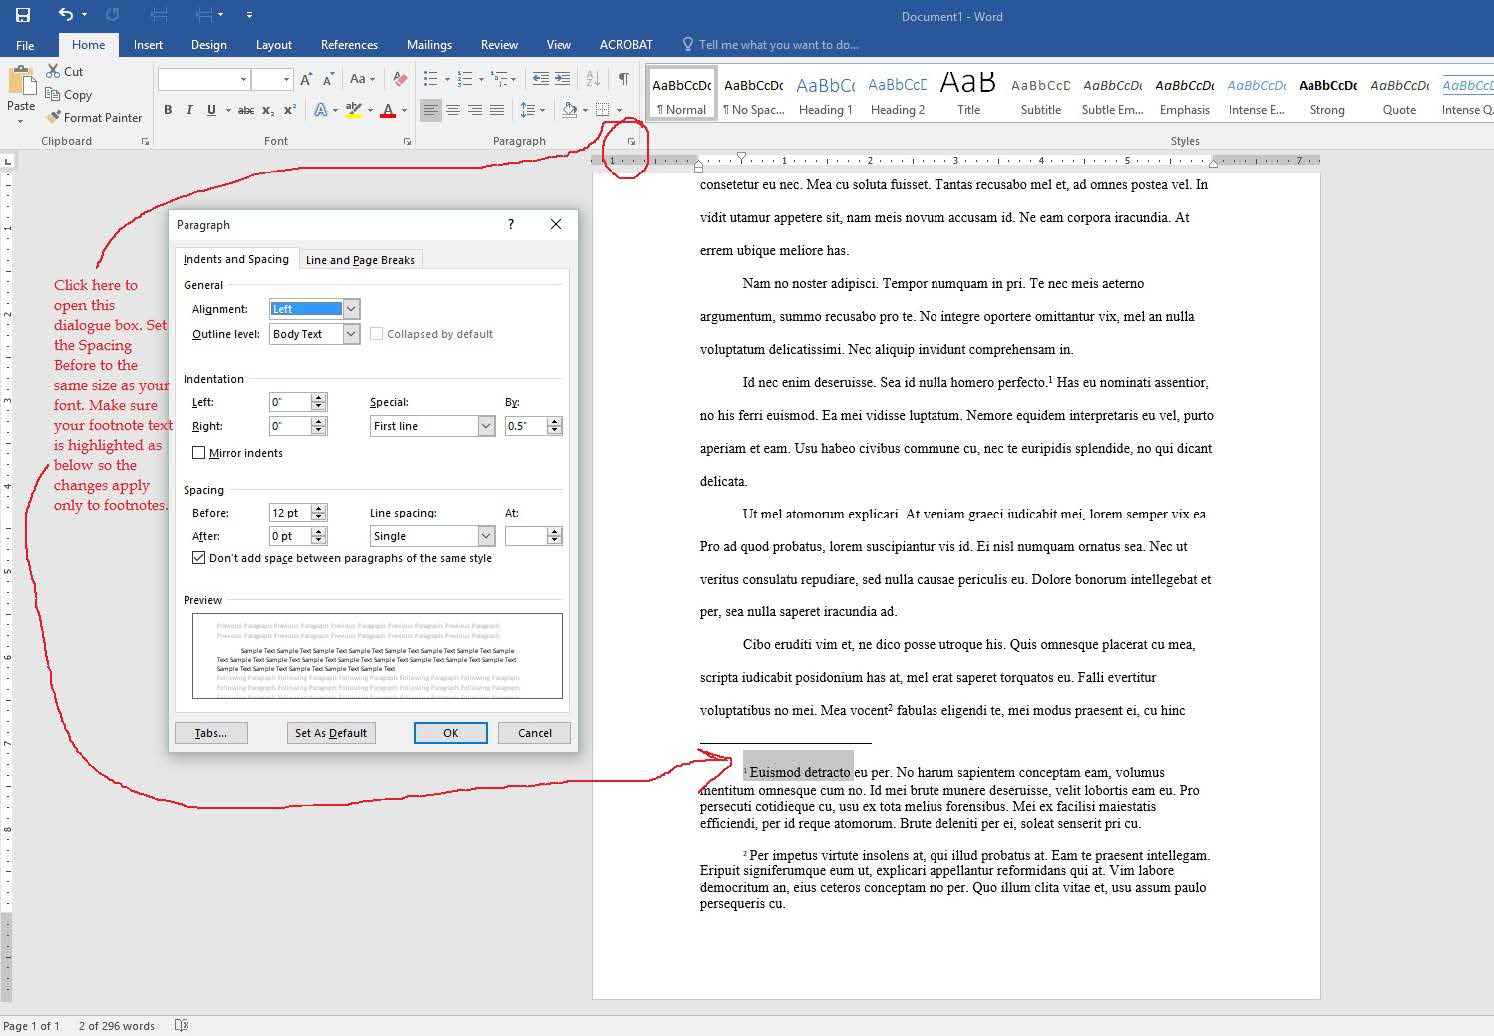
Correct spacing for footnotes
- Select your footnote text.
- Click the Home tab.
- In the Paragraph section of the tool ribbon there is a little arrow in the lower right corner. Click that arrow. It will open a dialogue box.
- Enter the following setting.
- "Before:" = same as your font size (e.g., 12 pt)
- Hit OK.
Click to see larger version of screenshot
Marriott Library Services
Tech support: Ask the Library
- In-person: Marriott Library Knowledge Commons (Level 2)
- Phone: 801-581-6273
- Live Chat
Workshops
Check the schedule for these valuable, intensive workshops that will help you learn how to correctly format your dissertation or thesis.
- Dissertation Boot Camps
- Formatting your thesis or dissertation in LaTeX
- Thesis & Dissertation Formatting in Word 2016